One of the downsides of living in a big city is petty crime. The other day when I got up to go to work I found that someone had stolen one of the indicators of my Mercedes Benz MB100D van! So today I'm going to explain step-by-step how we replace the entire indicator assembly. At the end of the post I'll also explain how to change just a blown bulb (more common).
If you are replacing a damaged indicator assembly the first step will be to remove it. Since someone has already done this for us I will just say that removal is simply a matter of reversing these steps!
Once you've removed the old/broken assembly, the next thing to do is remove the indicator bulb holder from the new assembly and connect it to the wiring loom. Copy the connections from the old indicator bulb holder (Since I didn't have anything to copy I connected the brown wires to the tip of the bulb - in fact I don't think it matters which way round you connect them).
This is easiest done before the indicator housing is replaced. The wires are easier to get at from the front of the van through the gap left by the missing indicator assembly.
Simply push the 2 spade connectors into place then gently hang the bulb holder and bulb into the wheel arch as shown. Now is a good time to check that everything is working correctly. Turn the ignition on and check that the direction indicators and the hazard lights now function correctly . There's no need to start the engine, if everything is OK the indicators should now work.
If they don't check the following:
- That the spade connectors are connected and that they aren't short circuited.
- That the fuse hasn't blown ( The fuses are on a board under the dash by the steering column. The indicator fuse is the fourth one down on the right hand side. If it has blown change it for a 7.5A replacement - check for short circuited connectors first)
- That the relay isn't working. The Mercedes Benz MB100D has 2 relays related to the indicators, one for the hazard lights and one for direction indicators. They are on the fuse board under the dash and are the 2 larger relays.
 |
| Connect the bulb holder and check the indicators work correctly before replacing the assembly |
 |
| Carefully let the indicator bulb hang down inside the wheel arch |
Once you've checked that everything works and the bulb is hanging inside the wheel arch you can now fit the indicator assembly in place.
This simply clicks into place and is held there by the 2 integral clamps. First you locate the tabs at the side of the headlight then push the assembly home until it if firmly seated. You will hear the 2 plastic clamps at the back of the headlight click into place but keep pushing until the 2 outer grooves locate firmly on the van bodywork. You need to push fairly hard to get it to locate totally flush with the wings. Don't be afraid, I ended up giving brisk taps on the indicator lens with the heel of my hand to get it to sit fully flush.
 |
| The 6 location points |
Once the Indicator assembly is fitted you can twist the bulb holder into place. This is done from below,reaching up from the wheel arch. The good thing about older vehicles is that there's plenty of space to do this!
 |
| Twist the bulb holder into place from below |
Here's a few more detailed photos that might be useful.
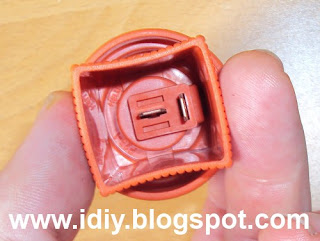 |
| Spade connectors of replacement bulb holder |
 |
| Replacement indicator housing showing 5 of the 6 locating points |
IMPORTANT
If you're simply replacing a blown bulb then you don't need to remove the whole assembly. Simply reach up from below the wheel arch and twist the bulb holder out (quarter turn anti clockwise). Replace the bulb then twist the holder back in place.
If after doing this the indicators don't work check the fuses (panel under the dash next to the steering column) and relays as described above.
As always - If you have any questions or comments please leave a comment below and I'll try to help out if I can.


