Sunday, August 4, 2013

How to Fix a Trailer Connector Electrics

My 20 year old Mercedes van failed its last MOT (actually because I live in Spain it was the Spanish ITV) because of a faulty trailer connector. Unfortunately they didn't tell me what was wrong, just that it didn't work. Since I haven't got a trailer or a caravan the only way to find the problem was step-by-step troubleshooting using a voltmeter. If you haven't got a voltmeter you could also use a bulb with two wires to check between the pins on the trailer connector.

How to Fault-Find Trailer Electrics

The first thing to do is a visual check to see that the connector pins are clean and not damaged.

Next I dismounted the plastic socket and checked that the wires were all connected firmly and that the colour codes followed the diagram below.

Wiring Diagram Trailer Connector

electricalwiring diagram for trailer connector
Wiring diagram


All the wires were firmly connected and the colour coding was correct so the next thing to do was check that the pins were connected correctly using a volt meter.

First I checked that the earth pin had continuity with the earth strap of the battery.

Then I checked that there was continuity between each pin of the trailer connector and the live connector of the corresponding bulb holder on the van.

All the connectors checked out OK for continuity, so the next step was to check for shorts.

To do this you have to remove the bulbs, otherwise all the pins will register a short circuit to earth.

The next thing to check is that each pin gets 12V when it should be lit (see wiring diagram above).

When I checked this I found that one of the rear bulbs didn't get 12V, odd seeing how there was continuity and there didn't seem to be any short circuits.

When you find something odd like this, a bulb which doesn't get voltage but which seems to be connected correctly. The chances are that it is because of a bad earth connection. So I decided to add a second wire to connect the earth pin of the connector to the chassis of the van (see photo)


Once this was done all pins checked out correctly with the volt meter, so I took the van back to be retested and "hey presto" it passed the MOT!

Thursday, January 10, 2013

How to Descale a Philips Senseo Coffee Maker

Modern coffee makers have become a big success, largely because they are so hassle free and easy to use. Let’s be honest, the coffee might not be quite as good as a traditional coffee machine but the big plus is that there’s no messy coffee grounds to deal with. Convenience is the name of the game here. Saying that, as clean and easy as they are to use, once in a while you need to descale them. Luckily that too is easy to do!

 Phillips recommends that you should descale your coffee maker at least once every three months.


To descale your Philips Senseo coffee maker you will need:


  •  Enough “Citric Acid Based Descaling Mix” to make 2 litres of mild descaling solution. 
  • A measuring jug 
  • A bowl 
  • A spoon to mix the solution 
  • 2 used coffee capsules (no need to waste new ones these just serve as filters while descaling) 
  • About half an hour or so to spare

First check the instructions on the packet of descaling mixture to see how much you need to mix to make a litre of descaling solution. You are going to need 2 litres.

Stage 1: Descaling

Mix a litre of descaling solution in a jug with cold water and stir with the spoon.

Fill the Coffee maker reservoir with the descaling solution and fit it to the coffee maker.

Place the bowl on the drip tray (see photo)

Insert a coffee capsule in the one cup holder and close the machine.

Switch on the Philips Senseo coffee maker, once the red light is steady press the 2 cup button.

You have now started the descaling process.


Once the coffee machine stops filling the bowl with descaling mix, wait until the red light stops flashing then press the 2 cup button again.

Keep doing this until you have used up the 2 litres of descaling solution. (Fill the reservoir and empty the bowl as necessary!)

Stage 2: Rinse Clean

Once you have used up all the descaling solution remove the water reservoir and rinse it under the tap.

Refill the reservoir with clean tap water and fit it to the machine. Place the bowl on the drip tray and put the other used coffee capsule in the one capsule holder.

Begin the rinsing process as before.

You must now rinse the machine with at least 2 reservoirs full of clean water to ensure that no citric acid solution remains in the machine.

Your Senseo coffee machine is now descaled and ready to use!

Monday, September 10, 2012

How To Replace The Indicator Bulb of a Mercedes Benz MB100D Van

One of the downsides of living in a big city is petty crime. The other day when I got up to go to work I found that someone had stolen one of the indicators of my Mercedes Benz MB100D van! So today I'm going to explain step-by-step how we replace the entire indicator assembly. At the end of the post I'll also explain how to change just a blown bulb (more common).

If you are replacing a damaged indicator assembly the first step will be to remove it. Since someone has already done this for us I will just say that removal is simply a matter of reversing these steps!

White mercedes benz van with missing indicator


Once you've removed the old/broken assembly, the next thing to do is remove the indicator bulb holder from the new assembly and connect it to the wiring loom. Copy the connections from the old indicator bulb holder (Since I didn't have anything to copy I connected the brown wires to the tip of the bulb - in fact I don't think it matters which way round you connect them).

This is easiest done before the indicator housing is replaced. The wires are easier to get at from the front of the van through the gap left by the missing indicator assembly.

Simply push the 2 spade connectors into place then gently hang the bulb holder and bulb into the wheel arch as shown. Now is a good time to check that everything is working correctly. Turn the ignition on and check that the direction indicators and the hazard lights now function correctly . There's no need to start the engine, if everything is OK the indicators should now work.

If they don't check the following:
  1. That the spade connectors are connected and that they aren't short circuited.
  2. That the fuse hasn't blown ( The fuses are on a board under the dash by the steering column. The indicator fuse is the fourth one down on the right hand side. If it has blown change it for a 7.5A replacement - check for short circuited connectors first)
  3. That the relay isn't working. The Mercedes Benz MB100D has 2 relays related to the indicators, one for the hazard lights and one for direction indicators. They are on the fuse board under the dash and are the 2 larger relays.


Mercedes benze indicator bulb holder fitted to wiring loom
Connect the bulb holder and check the indicators work correctly before replacing the assembly
The indicator bulb hangs inside the wheel arch
Carefully let the indicator bulb hang down inside the wheel arch
Once you've checked that everything works and the bulb is hanging inside the wheel arch you can now fit the indicator assembly in place.

This simply clicks into place and is held there by the 2 integral clamps. First you locate the tabs at the side of the headlight then push the assembly home until it if firmly seated. You will hear the 2 plastic clamps at the back of the headlight click into place but keep pushing until the 2 outer grooves locate firmly on the van bodywork. You need to push fairly hard to get it to locate totally flush with the wings. Don't be afraid, I ended up giving brisk taps on the indicator lens with the heel of my hand to get it to sit fully flush.
photo showing where the indicator housing connects to the van
The 6 location points
Once the Indicator assembly is fitted you can twist the bulb holder into place. This is done from below,reaching up from the wheel arch. The good thing about older vehicles is that there's plenty of space to do this!


indicator housing seen from below through the wheel arch
Twist the bulb holder into place from below
Here's a few more detailed photos that might be useful.
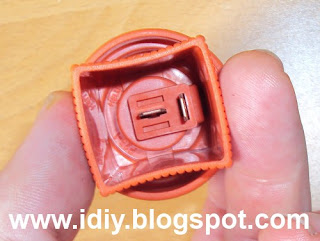

orange indicator bulb holder
Spade connectors of replacement bulb holder


Mercedes indicator assembly showing locating points
Replacement indicator housing showing 5 of the 6 locating points
IMPORTANT
If you're simply replacing a blown bulb then you don't need to remove the whole assembly. Simply reach up from below the wheel arch and twist the bulb holder out (quarter turn anti clockwise). Replace the bulb then twist the holder back in place.

If after doing this the indicators don't work check the fuses (panel under the dash next to the steering column) and relays as described above.

As always - If you have any questions or comments please leave a comment below and I'll try to help out if I can.